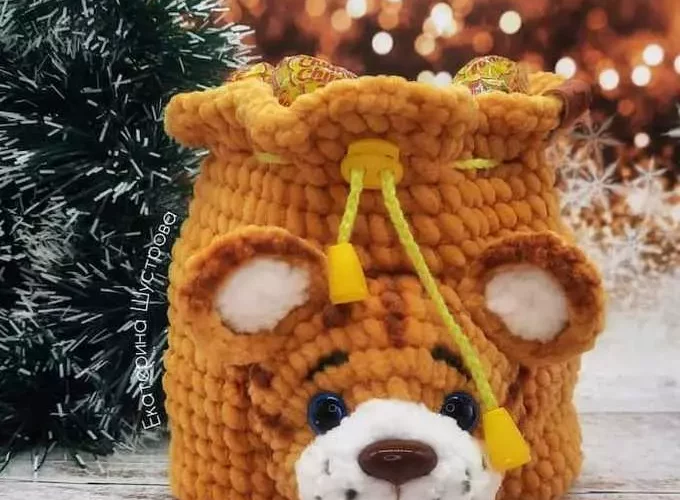
Christmas Tiger Gift Bag – Crochet Pattern
Body (Bag)
Main color. Work in rounds; do not stuff.
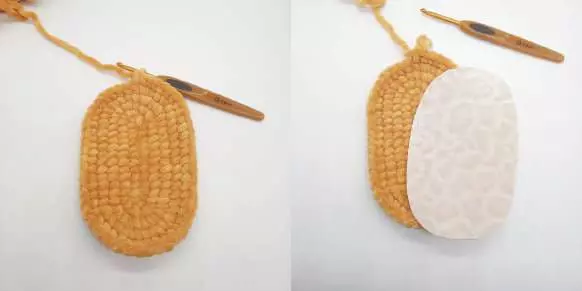
Round 1: ch 13, starting in 2nd ch from hook: inc, 10 sc, 4 sc in last st; on the other side of the chain: 10 sc, inc (28)
Round 2: 2 inc, 10 sc, 4 inc, 10 sc, 2 inc (36)
Round 3: (1 sc, inc) × 2, 10 sc, (1 sc, inc) × 4, 10 sc, (1 sc, inc) × 2 (44)
Round 4: (2 sc, inc) × 2, 10 sc, (2 sc, inc) × 4, 10 sc, (2 sc, inc) × 2 (52)
Round 5: 52 sc (52)
Cut an oval from cardboard or plastic matching the 5th round for the base (do not glue yet).
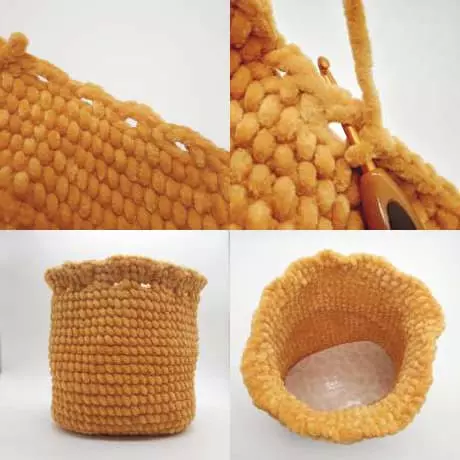
Round 6: work in back loops only: (5 sc, inc, 6 sc, inc) × 4 (60)
Rounds 7–21: 60 sc (15 rounds)
Round 22: (2 sc, ch 2, skip 2 sts) × 15 (creates drawstring holes)
Round 23: (2 sc, 2 sc under ch space) × 15 (60)
Round 24: (1 sc, ch 1) × 60, sl st to first st. Fasten off and weave in ends.
Glue the oval base inside. You can add extra rounds of 60 sc to make the bag taller.
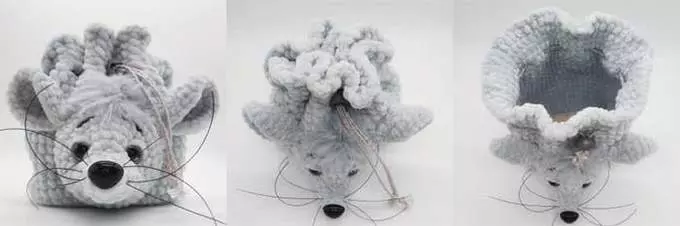
Muzzle
Start with white yarn. The marker goes along the side.
Round 1: ch 7, starting from 2nd ch from hook: inc, 4 sc, 4 sc in last st; on other side: 4 sc, inc (16)
Round 2: 2 inc, 4 sc, 4 inc, 4 sc, 2 inc (24)
Round 3: 24 sc
Round 4: (2 sc, dec) × 6 (18)
Switch to main color.
Round 5: 18 inc (36)
Round 6: 1 sc, inc, (2 sc, inc) × 5, 19 sc (42)
Rounds 7–8: 42 sc
Round 9: 21 sc, then fasten off.
Insert safety eyes between rounds 5–6, spaced 8 sts apart.
Ears
Work one part with white yarn and one with main color.
White part:
1: 6 sc in MR (6)
2: 6 inc (12), sl st in first st, fasten off.
Main part:
1: 6 sc in MR (6)
2: 6 inc (12), sl st in first st, ch 1
Hold both pieces together (wrong sides facing each other) with white part toward you. Crochet through both layers:
3 sc, 1 hdc, 1 dc, 2 dc inc, 1 dc, 1 hdc, 3 sc (14) sl st, fasten off.
Mark the last stitch — it’s the bottom of the ear. Make a second ear the same way.
Assembly
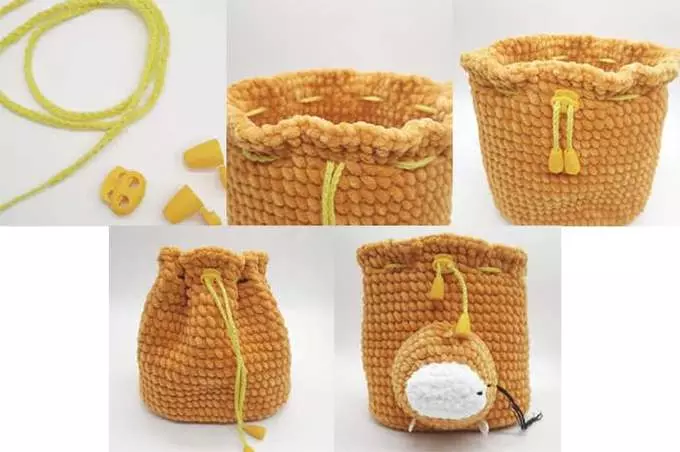
Prepare a drawstring (≈55 cm) or crochet one from chain stitches. Insert it through the holes, attach stopper and cord ends.
Pin the muzzle to the bag, centered and 1–2 rounds from the bottom edge. Sew securely, stuffing slightly as you go.
Make a light shaping (face indentation):
Mark points 1 (mouth), 2 and 3 (eyes).
Start at point 1 → go to point 2 → back to 1 → to point 3 → back to 1, tightening evenly to shape the face.
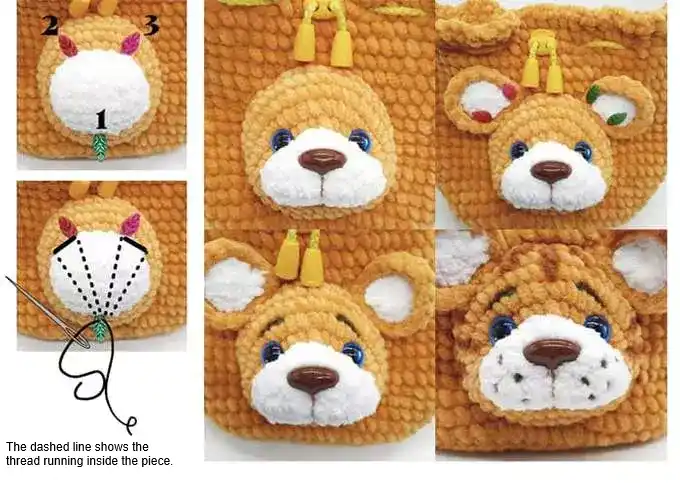
Embroider the mouth and eyebrows with matching thread.
Glue or sew on eyes and nose.
Attach ears symmetrically (7 stitches apart).
Add painted or embroidered whisker dots if desired.
You can easily turn this pattern into other animals (mouse, bear, bunny, etc.) — just change colors, ears, and face details. The same base can also be used for a child’s little handbag — simply add a strap!