Multicolored Pullover – Knitting Pattern
International Closing Size Conversion Chart

Blouse, jacket, sweater

Multicolored Pullover
Source: BurdaStyle
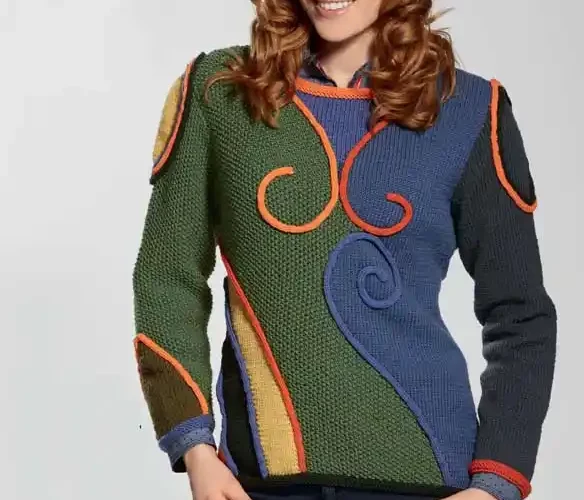
This pullover seems to gather all the colors of autumn. Although the stitch patterns used are quite simple, knitting requires great attention due to the many color changes.
Size:
38/40 (EU)
You will need:
Yarn (100% natural wool; 125 m/50 g) — 250 g green, 150 g dark blue, 100 g dark gray, and 50 g each of orange, olive, dark green, yellow, rust, and light blue; knitting needles sizes 4 and 4.5 mm; circular needles sizes 4 and 4.5 mm; knitting dolly (French knitter) for making cords.
Stitch Patterns and Charts
Garter Stitch
Knit all rows (both RS and WS).
Reverse Garter Stitch
Purl all rows (both RS and WS).
Hem Pattern
4 rows garter stitch, 2 rows reverse garter stitch = 6 rows total.
Stockinette Stitch
Knit on the RS, purl on the WS.
Seed Stitch
Alternate 1 knit, 1 purl; shift the stitches after every row.
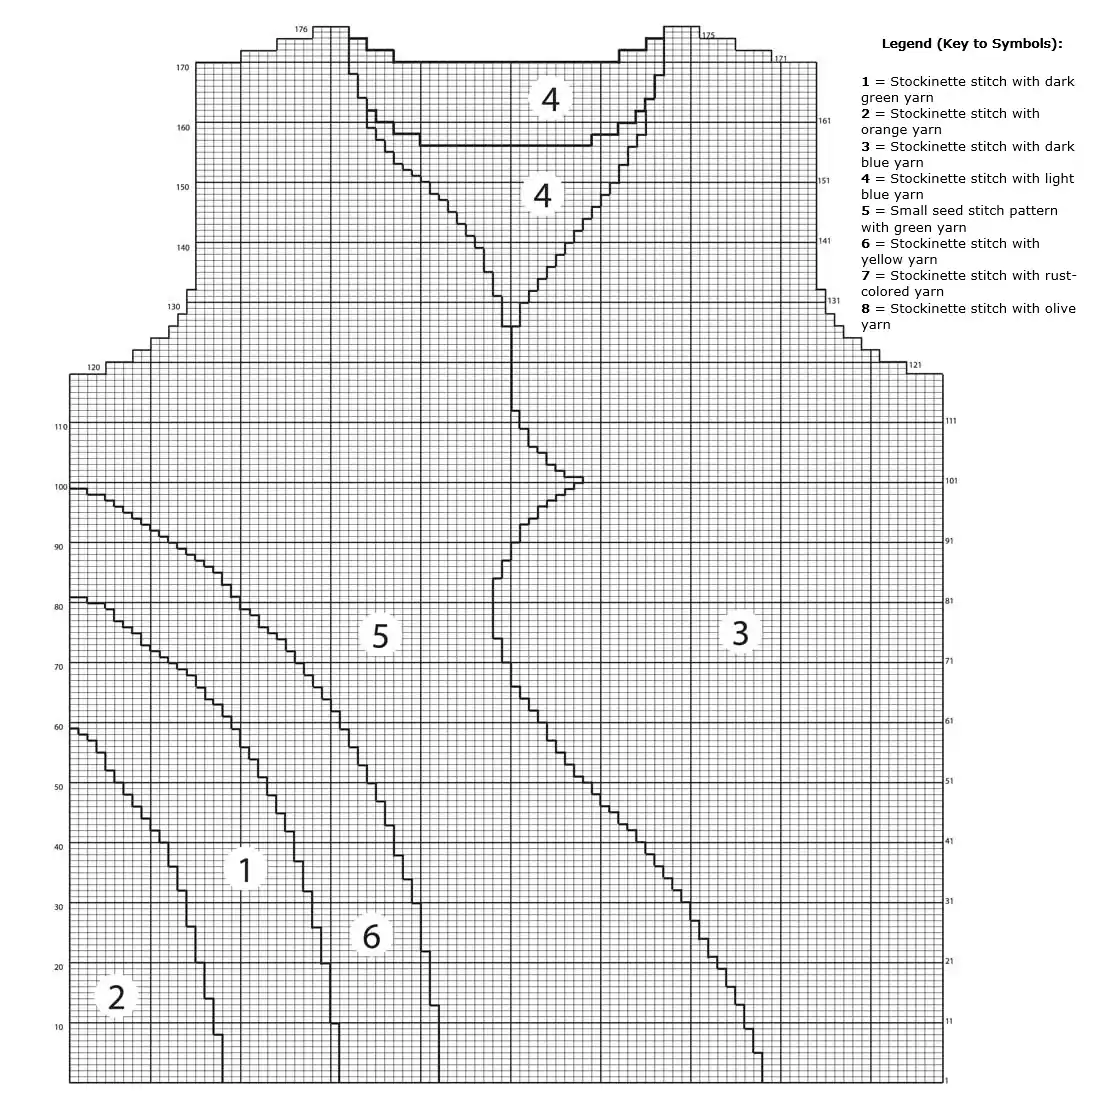
Intarsia Pattern on Front and Back
Work according to the chart over 97 stitches. Edge stitches are shown in the chart.
Each color section is worked with a separate ball of yarn; twist the yarns on the WS when changing colors to avoid holes.
The chart shows the front, work the back in mirrored fashion.
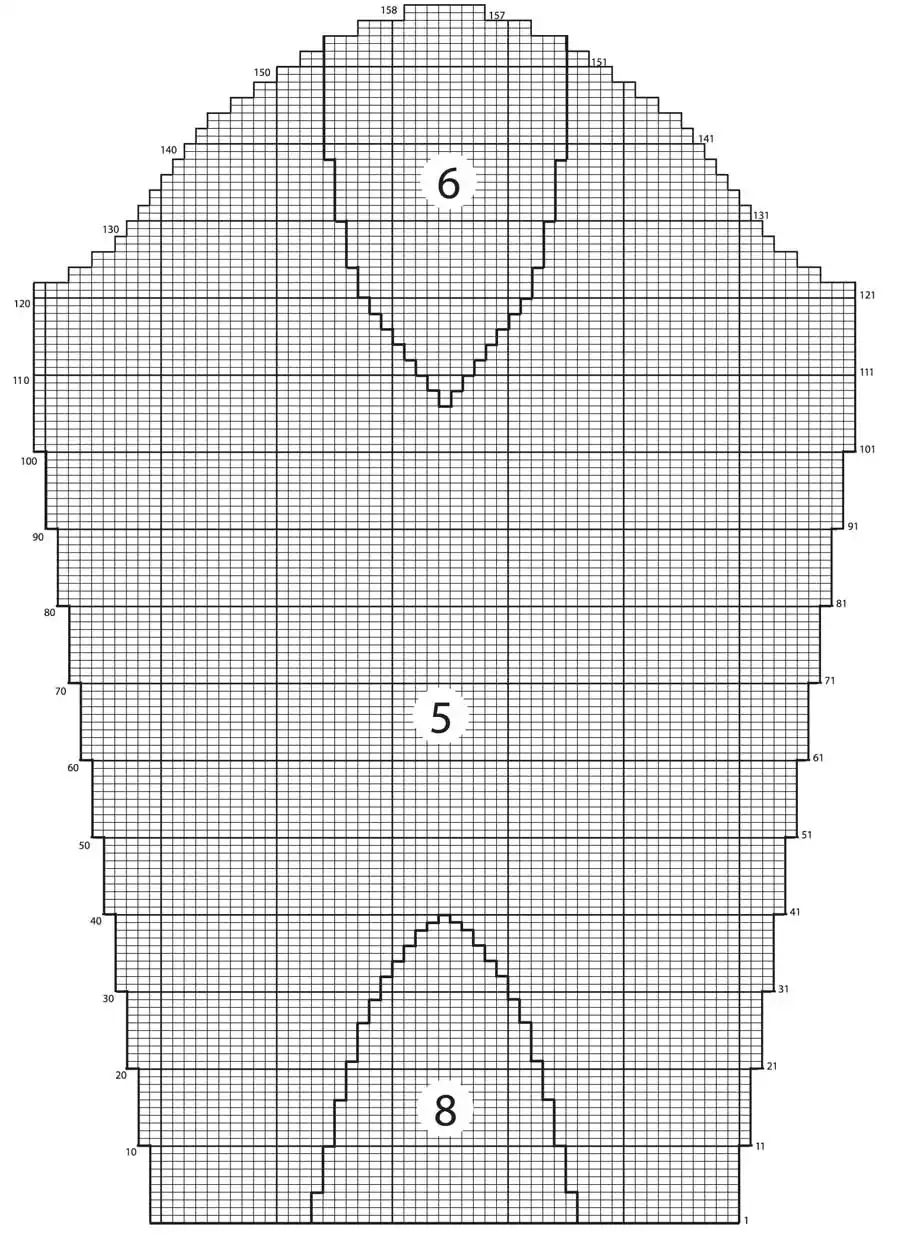
Intarsia Pattern on Right Sleeve
Work according to the chart over 51 stitches. Edge stitches are shown in the chart.
Follow the same technique as for the front and back.
Gauge
20 sts x 28 rows = 10 x 10 cm in intarsia patterns
20 sts x 29.5 rows = 10 x 10 cm in seed stitch
Both swatches were knitted using 4.5 mm needles.
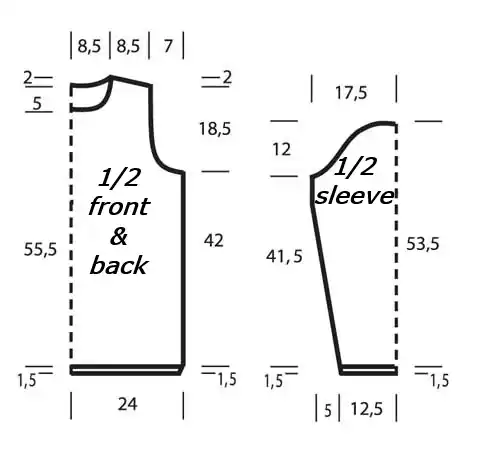
Pattern schematic
Cord Placement Diagram
Instructions
Front
With dark green yarn and 4 mm needles, cast on 97 sts and knit 1.5 cm = 6 rows in hem pattern.
Switch to 4.5 mm needles and continue working the intarsia pattern according to the front chart.
Shape armholes and shoulder slants as shown in the chart.
At the same time, after 55.5 cm = 156 rows from the hem, bind off the center 19 sts for the neckline and complete each side separately.
Shape the neckline curve according to the chart.
After 2.5 cm = 176 rows from the hem, all stitches will have been worked.
Back
Work the same as the front, but mirrored (read chart from left to right).
Work a higher neckline: after 60.5 cm = 170 rows from the hem, bind off the center 25 sts and shape the neckline curve as in the chart.
Right Sleeve
With 4 mm needles and light blue yarn, cast on 51 sts and work the hem as for the front.
Switch to 4.5 mm needles and continue with the sleeve chart.
Increase stitches at both edges for sleeve shaping. After 41.5 cm = 122 rows from the hem, begin binding off stitches for the sleeve cap.
After 53.5 cm = 158 rows from the hem, all stitches will have been worked.
Left Sleeve
With 4 mm needles and rust-colored yarn, cast on 51 sts and work the hem as for the front.
Continue with dark gray yarn and stockinette stitch using 4.5 mm needles.
At the same time, increase at both edges for sleeve shaping:
– every 8th row: 2 x 1 st
– every 10th row: 8 x 1 st → total 71 sts
After 41.5 cm = 116 rows from the hem, bind off 3 sts on each edge for the sleeve cap, then:
– every 2nd row: 2 x 2 sts, 6 x 1 st, 6 x 2 sts, 1 x 3 sts, and 1 x 4 sts
After 53.5 cm = 150 rows from the hem, bind off remaining 7 sts.
Finishing
Sew shoulder seams.
With orange yarn and 4 mm circular needles, pick up 90 sts around the neckline and work 6 rounds in reverse stockinette (purl every round), then bind off all sts as knit.
Set in sleeves. Sew side and sleeve seams.
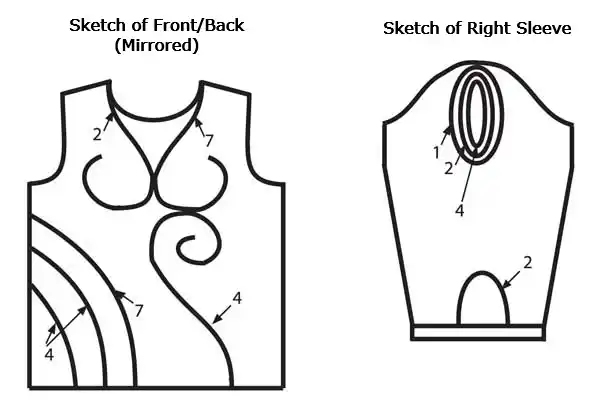
Use a knitting dolly to create cords of the required lengths. Attach them to the pullover and right sleeve according to the sketches and photos.
Numbers on the diagrams indicate the cord colors, which match the color designations on the charts.
On the front and back, cords go over the shoulders and side seams. On the left sleeve, attach one orange and one dark green cord in an oval shape at sleeve cap level.
