Stitch from “Lilo and Stitch” – Free crochet pattern
- January 9, 2024
- Posted by: DIY Educ
- Category: Toys

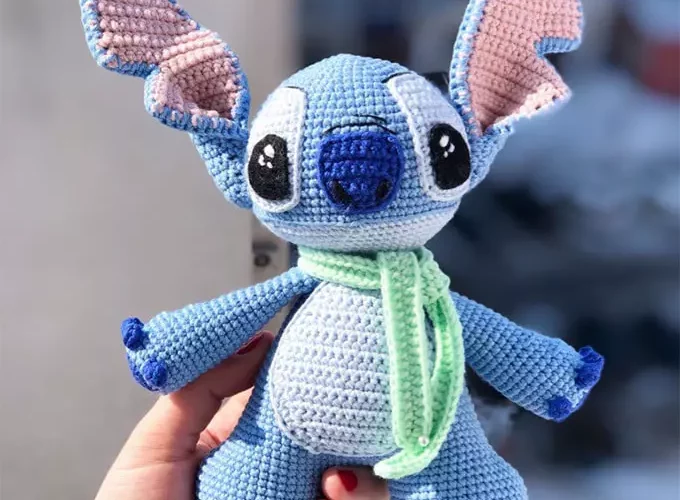
Free pattern on crocheting Stitch by Tatyana Medvedeva.
Difficulty level: intermediate
According to this description, you can crochet Stitch with a scarf using a crochet technique from the animated film “Lilo & Stitch.” Any cotton yarn is suitable for crocheting amigurumi: YarnArt Jeans, Alize Cotton Gold, Gazzal Baby Cotton, and others. Stitch’s eyes are made from black felt, the spots on the eyes and the nose are crocheted. Finer details on the muzzle (eyebrows and lines above the nose) are embroidered with thin mouline thread.
All parts are crocheted in a spiral, except for the ears and belly; they are crocheted in turned rows. Wireframe is not necessary – the details are sewn at an angle and hold their shape well.
Materials and Tools:
- Yarn: Gazzal Baby Cotton: 3410-white, 3423-blue, 3429-pale blue, 3421-cornflower
- Yarn: YarnArt Jeans: 79-mint, 83-dusty rose
- Mouline thread: black
- Hook: 2 mm
- Toy stuffing
- Safety eyes
- Glue
- Sewing needle for attaching details
- Scissors
Abbreviations:
- MR: magic ring
- ch: chain
- sc: single crochet
- inc: increase
- dec: decrease
- (…) x n: repeat n times
Head
Start with a blue color:
Rnd 1: 6 sc in MR
Rnd 2: 6 inc (12)
Rnd 3: (1 sc, inc) x 6 (18)
Rnd 4: (2 sc, inc) x 6 (24)
Rnd 5: (3 sc, inc) x 6 (30)
Rnd 6: (4 sc, inc) x 6 (36)
Rnd 7: (5 sc, inc) x 6 (42)
Rnd 8: (6 sc, inc) x 6 (48)
Rnd 9: (7 sc, inc) x 6 (54)
Rnd 10: (8 sc, inc) x 6 (60)
Rnd 11: (9 sc, inc) x 6 (66)
Rnd 12: (10 sc, inc) x 6 (72)
Rnd 13-20: 8 rows of 72 sc each
Rnd 21: (11 sc, inc) x 6 (78)
Rnd 22: (12 sc, inc) x 6 (84)
Rnd 23: Join light blue yarn: working in the back loops only (12 sc, dec) x 3, working in both loops (12 sc, dec) x 3 (78)
Rnd 24: (11 sc, dec) x 6 (72)
Rnd 25: (10 sc, dec) x 6 (66)
Rnd 26: (9 sc, dec) x 6 (60)
Rnd 27: (8 sc, dec) x 6 (54)
Rnd 28: (7 sc, dec) x 6 (48)
Rnd 29: (6 sc, dec) x 6 (42)
Start stuffing
Rnd 30: (5 sc, dec) x 6 (36)
Rnd 31: (4 sc, dec) x 6 (30)
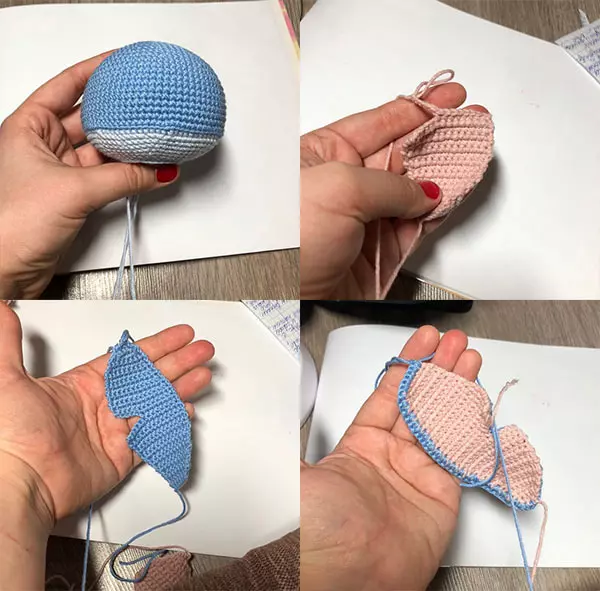
Finish stuffing. Fasten off, leaving a tail for sewing. Where we worked in the back loops, this will be Stitch’s mouth. Consider this when attaching the eyes and nose.
Ears
We’ll crochet two left pieces (pink and blue) and two right pieces (pink and blue). Leave a long tail from the blue piece for edging and joining with the pink piece. Crochet in turned rows (for the right pieces):
Row 1: 8 ch
Row 2: 7 sc, 1 ch
Row 3: inc, 5 sc, inc, 1 ch
Rows 4-6: 3 rows of 9 sc each (don’t forget 1 ch at the end of each row)
Row 7: inc, 7 sc, inc, 1 ch
Rows 8-10: 11 sc (don’t forget 1 ch at the end of each row)
Row 11: inc, 9 sc, inc, 1 ch
Rows 12-17: 13 sc (don’t forget 1 ch at the end of each row)
Row 18: Create the slit for the ear: 8 sc, 6 ch, turn the work
Crochet in the next stitch from the hook: 5 sc in the chain, 8 sc along the edge of the ear.
Rows 19-20: 13 sc (don’t forget 1 ch at the end of each row)
Row 21: dec, 11 sc, 1 ch
Row 22: 12 sc, 1 ch
Row 23: dec, 10 sc, 1 ch
Row 24: 11 sc, 1 ch
Row 25: dec, 9 sc, 1 ch
Row 26: 10 sc, 1 ch
Row 27: dec, 6 sc, dec, 1 ch
Row 28: 8 sc, 1 ch
Row 29: dec, 4 sc, dec, 1 ch
Row 30: dec, 2 sc, dec, 1 ch
Row 31: 2 sc, dec
Fasten off the pink pieces and cut the yarn, leave longer tails for joining the blue pieces together (edging).
Crochet the left pieces the same until row 18: 13 sc. Then in row 19, work: 8 sc, 6 ch, and continue following the pattern!
This is done to ensure symmetric ears.
After crocheting all the pieces, take the blue piece and start joining it with the pink one. Just edge around in a circle. Join the left pieces together and the right pieces together. When edging, fold the ears in half, as shown in the last photo, and edge together with approximately 5-6 sc.
Continue edging one unworked side, and finish the top of the ear.
Eye Patches (2 pieces)
Crochet with light-blue yarn, in turned rows. Left piece:
Row 1: 6 ch
Row 2: inc, 3 sc, inc, 1 ch (7)
Row 3: inc, 6 sc, 1 ch (8)
Row 4: 7 sc, inc, 1 ch (9)
Row 5: dec, 7 sc, 1 ch (8)
Row 6: 6 sc, dec, 1 ch (7)
Rows 7-9: Three rows of 7 sc, 1 ch
Row 10: 5 sc, dec, 1 ch
Row 11: dec, 4 sc, 1 ch
Row 12: 3 sc, dec
Make 1 ch and edge entirely around the piece.
Crochet the left piece in the same way until row 4, then swap decreases and single crochets, for instance, in row 5 crochet: 7 sc, dec, 1 ch, and so on. Finish off the piece similarly at the end.
Nose
Crochet with dark blue yarn, in turned rows:
Row 1: 4 ch
Row 2: inc, 1 sc, inc, 1 ch
Row 3: 5 sc, 1 ch
Row 4: inc, 3 sc, inc, 1 ch
Rows 5-8: 7 sc
Make 1 ch and edge around. Leave a tail for sewing. At this stage, cut eye shapes from black felt. They should resemble our eye patches in the photo but smaller in size.
Legs (2 pieces)
Start crocheting the legs with a dark blue color:
Rnd 1: 6 sc in MR
Rnd 2: 6 inc (12)
Rnd 3: (1 sc, inc) x 6 (18)
Rnd 4: (2 sc, inc) x 6 (24)
Continue with a blue color
Rnd 5: (3 sc, inc) x 6 (30)
Rnd 6: (4 sc, inc) x 6 (36)
Rnd 7: (5 sc, inc) x 6 (42)
Rnd 8: Work 15 sc in the back loop of stitches and crochet the toes in a cluster with one top: 5 hdc in 1 loop, slightly pull the last loop and insert it into the first hdc loop. Then pick up the remaining open loop and pull it through the first one. (note at the end of the tutorial). Crochet the cluster as shown in the pattern (cluster, 1 sc) x 5
Then crochet 17 sc in the back loop of stitches.
Rnd 9-15: 7 rows of 42 sc each
Body
Finish and cut the thread for the first leg, leave the thread for the second leg, move the marker to the middle of the inner part of the leg, and crochet ch 6. (It’s important that the toes face straight)
Rnd 16: Next, on the sides of the legs, crochet (1 sc, dec) x 3. For me, it turns out: 15 sc, (1 sc, dec) x 3, 18 sc along the leg, 6 sc in the chain, 18 sc along the leg, (dec, 1 sc) x 3, 15 sc, 6 sc in the chain (90)
Rnd 17: 12 sc, (1 sc, dec) x 3, 42 sc, (dec, 1 sc) x 3, 18 sc (84)
Rnd 18: 13 sc, (1 sc, dec) x 3, 34 sc, (dec, 1 sc) x 3, 19 sc (78)
Rnd 19-20: 78 sc
Rnd 21: (11 sc, dec) x 6 (72)
Rnd 22: (10 sc, dec) x 6 (66)
Rnd 23-30: 8 rows of 66 sc each
Rnd 31: (9 sc, dec) x 6 (60)
Rnd 32: 60 sc
Rnd 33: (8 sc, dec) x 6 (54)
Rnd 34: 54 sc
Rnd 35: (7 sc, dec) x 6 (48)
Rnd 36-37: 48 sc
Start stuffing
Rnd 38: (6 sc, dec) x 6 (42)
Rnd 39: 42 sc
Rnd 40: (5 sc, dec) x 6 (36)
Rnd 41: (4 sc, dec) x 6 (30)
Rnd 42-43: 30 sc
Finish stuffing until the end.
Right Hand
Start with a dark blue color:
Rnd 1: 6 sc in MR
Rnd 2: 6 inc (12)
Rnd 3: (1 sc, inc) x 6 (18)
Continue with a blue color:
Rnd 4: (2 sc, inc) x 6 (24)
Rnd 5: 6 sc in the back loops of stitches, join dark blue yarn, and crochet a finger as on the legs (5 hdc in 1 loop)
Change to blue in the next loop and crochet 2 sc in the back loops.
Switch back to dark blue in the following loop and crochet 3 more fingers (cluster, 1 sc) x 3, after the last cluster, switch to blue and crochet the remaining 6 sc in the back loops.
Rnd 6-9: Continue with light blue color: 24 sc for 4 rows, start stuffing
Rnd 10: 12 sc, 3 dec in the back loops of stitches, 6 sc (make sure decreases are where the fingers are)
Rnd 11-12: 21 sc
Rnd 13: 11 sc, 3 dec in the back loops of stitches, 4 sc (18)
Rnd 14-25: 18 sc
Finish stuffing until the end.
Left Hand
Start with dark blue color:
Rnd 1: 6 sc in MR
Rnd 2: 6 inc (12)
Rnd 3: (1 sc, inc) x 6 (18)
Continue with a blue color:
Rnd 4: (2 sc, inc) x 6 (24)
Rnd 5: 6 sc in the back loops of stitches
Join dark blue yarn and crochet not 1 finger but 3 fingers.
Switch to blue in the next loop and crochet 2 sc in the back loops.
Switch back to dark blue in the following loop and crochet the last finger, then continue crocheting the remaining 6 sc in the back loops.
Rnd 6-9: Continue with light blue color: 24 sc for 4 rows, start stuffing
Rnd 10: 7 sc, 3 dec in the back loops of stitches, 11 sc (make sure decreases are where the fingers are)
Rnd 11-12: 21 sc
Rnd 13: 6 sc, 3 dec in the back loops of stitches, 9 sc (18)
Rnd 14-25: 18 sc
Finish stuffing until the end.
Belly
Using light blue color, in turned rows:
Row 1: Chain 7
Row 2: inc, 4 sc, inc, 1 ch
Row 3: inc, 6 sc, inc, 1 ch
Row 4: 10 sc, 1 ch
Row 5: inc, 8 sc, inc, 1 ch
Row 6: 12 sc
Row 7: inc, 10 sc, inc, 1 ch
Row 8: inc, 12 sc, inc, 1 ch
Row 9: inc, 14 sc, inc, 1 ch
Rows 10-13: 4 rows of 18 sc
Row 14: dec, 14 sc, dec, 1 ch
Row 15: dec, 12 sc, dec, 1 ch
Row 16: 14 sc, 1 ch
Row 17: dec, 10 sc, dec, 1 ch
Row 18: dec, 8 sc, dec, 1 ch
Row 19: dec, 6 sc, dec, 1 ch
Row 20: dec, 4 sc, dec, 1 ch
Row 21: 6 sc, 1 ch
Crochet single crochets around the belly in a circular manner.
Scarf
Crochet using mint green color, in rows:
Chain 120
Crochet the scarf with half-double crochets, with yarn overs, making 4-5 increases in the last and first stitches of each row (to create a more rounded and aesthetic transition to the next row).
Finishing Stitch’s Muzzle
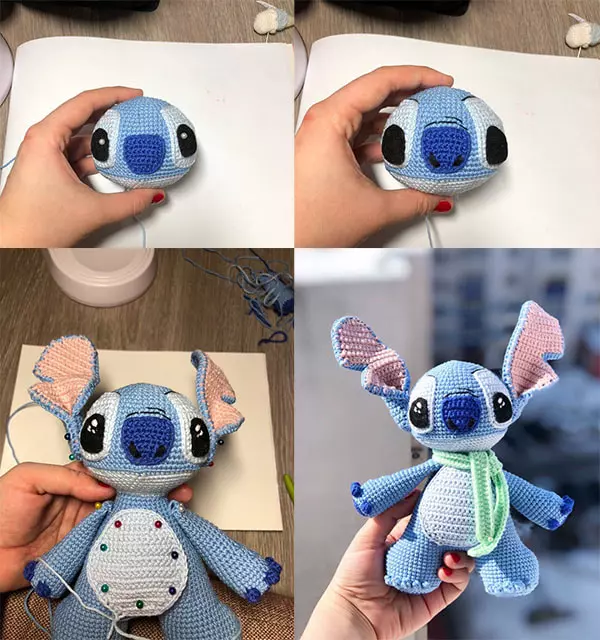
- Secure the nose with pins, ensuring it’s centered.
- Approximately 2 single crochets away from the nose, attach eye patches. Place previously cut felt eyes on them to check the eye size.
- If everything aligns, sew the patches and nose.
- Now take white yarn (you can use Gazzal Baby Cotton, separating the strands as we’ll embroider with a single thread).
- Attach the eyes again and using a thin needle, embroider white highlights: a large one above and a smaller one below. Make random stitches, anchoring them to Stitch’s head. Embroider the third highlight with light blue yarn. Repeat the same for the second eye.
- Use fabric glue or a glue gun and carefully attach the eyes completely.
- With black embroidery floss, using two strands, embroider the nostrils, folds over the nose, and eyebrows.
- At this stage, attach the head and then the ears.
- Sew the ears, leaving 1 single crochet from the eye patches. The tip of the ear should align with the color transition line.
- I attached them only at the front, where the ears join together.
- Attach the belly, arms (with larger fingers facing forward), tie the scarf, and Stitch is ready!


